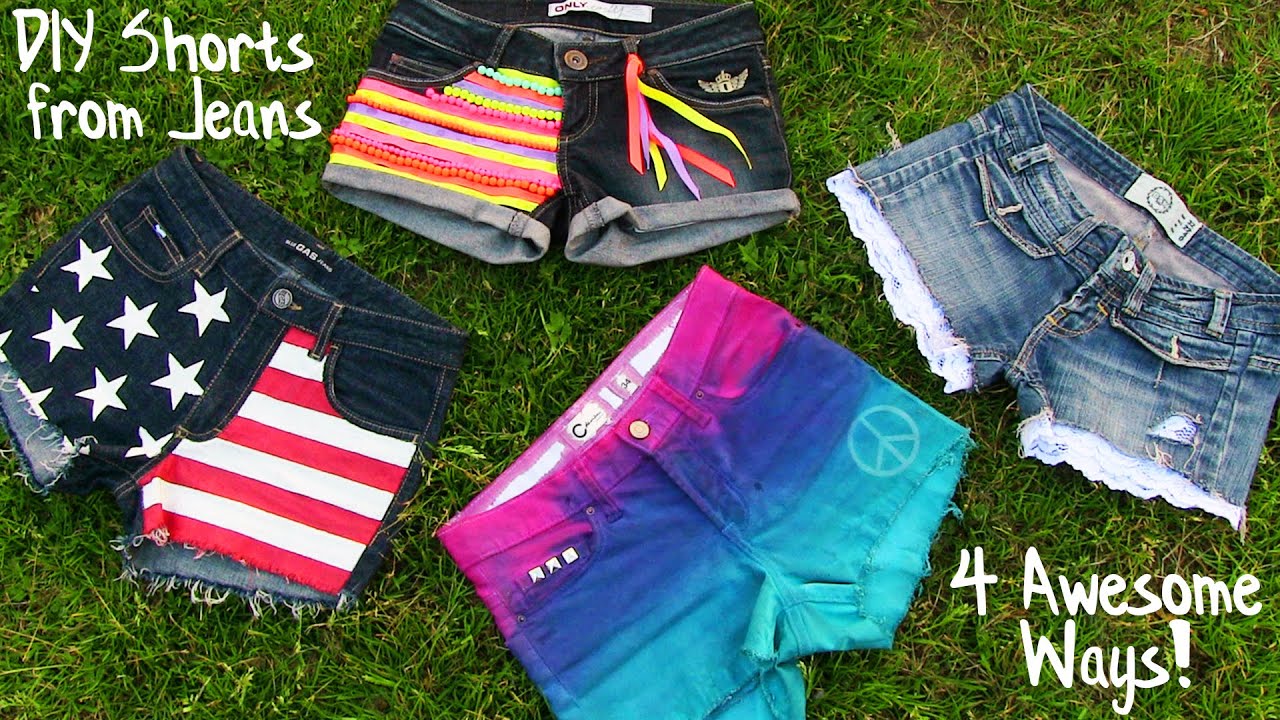
In this DIY tutorial I’ll show you how to
make beautiful shorts out of old jeans. We are making 4 amazing designs perfect for warm
summer days. Hey guys! Look where I am!?
I am actually
deep in the Norwegian mountains right now, I came here for a couple of days and it’s
so beautiful! And here’s nobody. Not a living soul. Not even a single tree. Wait.
. What
if a troll comes? But anyway, this is not the point of this video because now I’m going
to show you four different and totally amazing DIY shorts ideas.
I’m pretty sure you have
some old jeans at the back of your closet that you don’t wear anymore, but you do need
shorts for summer. And not just any shorts, you need cute, beautiful, amazing shorts this
summer and don’t worry, I got you covered because I’m going to show you how to make
them.
So let’s jump into the tutorial. First we are making these always fashionable
American shorts. They are inspired by the american flag, so they are full of white — red
stripes and white stars. No, no, no, we don’t have time to nap, we’ve got some work to do.
You’ll need old jeans, scissors, a needle, pencil or a pen, tweezers to distress the
jeans, masking tape, star print outs, self-adhesive or just normal paper, piece of carton board,
white and red fabric paint and lastly sponge applicator or paint brush to apply the paint.
First we need to cut the shorts. Try them on and mark the desired length. You can use
a pencil but if your jeans are dark as mine, a needle will work better.
Remember to leave
an extra inch of length because we will distress the edge. And of course it’s better to shorten
them little by little instead of cutting them too short at once and ruining your jeans.
Also you can use any other shorts you really like as a guide. I placed my favorite yellow
shorts on top of the jeans and cut them a bit lower than the yellow ones just to be
sure. Fold the jeans like so and cut the other leg. This way they will be exactly the same
on both sides. Then try your shorts on!
Mine are to long so I am going to cut them again
and I’ll make them shorter in the front and a bit longer in the back.
Now it’s time to take your anger out and distress the edge that we just cut. Take your tweezers
and start pulling random threads out. You’ll see how your shorts will get this cool distressed
edge. Then use a nail file or a sand paper and rub them along the edges for a softer
distressed look.
In the end I like to cut these white strands a bit to make them equally
long all around the edge.
Next we need to make some star stencils, which
will help us create perfectly shaped stars on the shorts. I printed several different
sizes but in the end I chose to go with this one, so here I’m just cutting it out. Then
place your star on the self-adhesive paper and outline the shape with a pencil. Repeat
this several times until you have enough stencils to cover one side of your shorts.
And now
you need to cut the star out of each stencil. If you don’t have a self-adhesive paper, use
a normal one and just apply a bit of glue on one side.
Before placing stencils on the shorts you need to cover the areas you don’t want to
paint with a masking tape. At least the edges around the pockets, belt and zipper. This
way you’ll make sure that no paint stain will end up there while you’re making your design.
Plus the edges will be very straight and neat.
Let’s start on the left side with the stars.
Put a piece of cardboard under the fabric. This will prevent the color transferring on
the back of the shorts and will give you a flat surface to work on. Stick the stencils
on the shorts.
You can make a lot of smaller stars or few bigger. I decided to go with
a medium size, because I wanted the stars to be seen in all details from distance too.
And finally we are ready for my favorite part — painting! Dip the sponge applicator or
a paint brush in white fabric paint and start painting! Make short strokes from the edges
to the center to get crisp and neat lines.
If your shorts are very dark as mine, make
sure to use paint for dark fabric otherwise, the paint may not show off well. I applied
two coats of white for each star to make it really bright and opaque. When you are done
peel off the star stencils and you are left with beautiful stars!
Put the cardboard under the fabric on the right side. Here we need to make white and
red horizontal stripes.
Stick tape stripes closely one above the other like so.
Then
peel of every other tape stripe and now you can start painting. Dip the paint brush in
the red fabric paint and color the stripes. For detailed painting I like to use a paint
brush, but for larger areas I’m using a sponge applicator. If you don’t have it, a piece
of kitchen sponge would work too.
Again, make strokes away from the tape edges to get nice
sharp lines. When all the red stripes are done, peel of the remaining horizontal tape
pieces. We need to color these bare areas in white so dip your paint brush in white
fabric paint and start painting. To help you out, you can also stick a piece of masking
tape over a red stripe to protect it. Now you can quickly color the white stripes making
strokes in the direction away from the tape.
When all the white stripes are finished, remove
the masking tape from around the edges and here you go – the front of our American shorts
is finished and I am so happy with how it turned out.
I love the contrast between the
bright red and white and the dark jeans! When the paint is completely dry flip the
shorts around. Protect the area around the pockets with the masking tape like so. The
shorts look stunning already but we still have to paint our back pockets.
On the left
stick the star stencils and color them with white fabric paint. On the right side stick
tape pieces closely one above the other and then peel of every other stripe to get your
stripe stencil. Color the stripes with red, using a sponge or a brush.
Again, I applied
two coats of paint to achieve the desired opacity. Peel away the remaining horizontal
stripes and color these areas in white.
In the end remove all the masking tape pieces
to reveal your amazing work! I think these shorts look absolutely stunning! I also added
some silver chains on one side and paired them with a white lacey buttoned shirt and
white sneakers .
You can really keep it simple and let your
American shorts be the center of attention. Because they deserve it, right?
Next we are making these fun shorts with beads and ribbon. You’ll need old jeans, scissors,
fabric glue, colorful ribbon and beads, some thread and a needle. Start of by cutting the
shorts. Here I want to make a cuffed edge..
Similar to my yellow shorts. Therefore I need
to cut much lower from edge of the yellow shorts. About two to three inches below. Fold
the pants and cut the other leg. Try on your new shorts and fold the edge up a couple of
times like so.
If you are happy with the length you can use these paper clips to secure the
folded edge in place and then take your jeans off. To secure the folded part, apply a bit
of fabric glue on the inner edge between each clip.
Do this all around and remove the clips.
Now your folded edge will stay in place exactly how you want it.
It’s time to decorate the shorts with bright colored ribbon and beads!
Cut a piece of ribbon
and simply stick it on one side of shorts using a fabric glue. Next, I am going to make
a row of beads. Take some thread and a needle. Fold the thread a couple of times, thread
on a needle and make a knot on the other side. Make the first stitch through the jeans.
Then
take your beads – I went for minty green ones – and thread about six of them on. Make a
stitch towards the inside of the shorts, then go about one inch back with the thread and
make a stitch towards the outside of the shorts. Now go once again through the last two beads
to secure them in place.
Doing this will prevent that the beaded stripe would start hanging
down when you put the shorts on. Add a few more beads to finish the row.
Make a stitch
to the inside, then a knot or two and finally cut away the excess thread. Now you just have
to make random beaded and ribbon stripes all along one side of your shorts. Here I am going
for a corally ribbon. This one I’m sticking in place with a fabric glue and a help of
a toothpick. You can also first apply the glue all along the ribbon and then stick it
on your shorts.
The glue is quite visible through the ribbon at first but is much less
noticeable when it dries, so it doesn’t bother me. But if you want to you can always sew
the ribbon stripes instead of gluing them. Here I am again making a beaded row, but this
time using neon yellow beads. Thread on six of them and make a stitch to attach them to
the shorts.
Then thread on another six beads and make a stitch.
Just a few more beads,
the final stitch and the row is finished. Continue like this with some ribbon and some
beaded rows randomly for a fun pop of color and texture on your shorts. And there you
have it, the coolest looking pattern! With such a fun front, we have to balance it out
and make a party in the back as well.
Therefore, I’m covering one of the pockets with ribbon
and beads.
Here comes the first piece of ribbon, following with the row of beads and so on.
I really like the bold colors of my beads and ribbon, which pop on the dark jeans.
This is why recycling old clothes is so much fun! You get to choose the colors, the materials
and designs that suit your skin tone, personality or go perfectly with that shirt you have laying
in your closet because you never know what to pair it with.
Just the final ribbon piece and the pocket is finished.
Again, Flip the jeans around,
cut three ribbon stripes and wrap them around the belt loop for yet another fun touch to
these beautiful shorts.
I love how happy and bright these shorts are, and they just scream
summer. With shorts like these you really don’t need much accessories. I finished my
look with a coral top, some friendship bracelets and white sneakers. Next we are making beautiful lace detailed
shorts, for which you will only need old jeans, scissors, nail file, tweezers, lace and fabric
glue.
First cut the shorts, and I am using my beloved yellow ones for the guide.
I want
the front a bit shorter, therefore I am making some small adjustments until it looks something
like this. Try them on to see if you’re satisfied! I am happy with mine so I am taking a piece
of tape and sticking it to where I want the holes to be. It’s better to mark the holes
with the shorts on to avoid making holes on the wrong places.
. you know what I mean.
Take the shorts off and cut the holes on the marked spots.
I made two imperfect rectangles.
Now we need to distress the edges and the holes with tweezers, nail files, sand paper,
fork, anything you find appropriate.
Pull out some threads, rub the edges with
a nail filer and quickly your jeans will get all ragged and worn out looking.
When they seem scruffy and destroyed enough it’s time to grab some lace and cover the
holes with it. Cut out a piece that is a bit larger than the hole and place it on the inner
side of the shorts, covering the hole. This is how it will look in the end, pretty nice
right? Apply some fabric glue to stick the lace firmly to the shorts.
Repeat the steps
to cover the other hole. I like making the holes imperfect rather than
a perfect square, you could also do it in a shape of a diamond or a triangle. I just
think it goes better with a distressed look. Now we need to take larger pieces of lace
and decorate the legs of our shorts. So just grab a lace stripe and glue it all around,
starting in the back, because that is where you want the two ends to meet.
I like to place
the lace on the shorts and then lift it to apply one glue dot every inch or so. As you
do this press it firmly to assure the lace sticks well to the shorts and won’t come off.
And this is how our finished lace shorts look like. I really like the mixture of edgy with
the distressed part and romantic with the lace. It makes the shorts look so cute and
girly but cool at the same time.
I think these shorts are super easy to wear, you can combine
them with pretty much anything. Here I paired them with a cropped white top, long golden
necklace, some rings and my starred converse.
You could put on brown wedges or sandals,
but I kept it rather sporty as I went to play tennis in the park.
Give another life to your old clothes and be the creator of your own unique style. Along
the way you will freshen up your closet, save money and protect the environment.
Lastly, we’re going to make these cool studded
spray dyed shorts. You need white or light wash jeans, scissors, nail filer, tweezers,
a piece of self adhesive paper, two rounded objects like a glass or a lid, spray paint
and studs. Take a pen, mark the approximate length of your shorts and cut the jeans. Try
them on and if they are too long, fold the edge to the desired length, secure it with
paper clips and take the jeans off.
Now you can cut the sorts again knowing that they
will fit you perfectly.
This is just another way of making a flawless cut on your jeans.
Then take your tweezers and nail filer and distress the edges to your liking. You can
also make holes, tear them a bit or do whatever you like. I decided not to make any holes,
instead I will create a piece sign on one side. Take a piece of self adhesive paper
and draw a circle.
I am just using a glass and outlining it. Then make a smaller circle
inside, I am using a lid of a moisturizer or something. Cut the larger circle out and
then cut along the smaller circle to get a ring like this. Now cut one longer paper stripe
and two shorter stripes. Combining this four elements will give you the perfect peace sign
stencil.
Before you start spray painting you have to
protect your working surface. It’s better to do this outside but in any case put a piece
of plastic bag on the ground to protect the grass or whatever you are working on.
I also
put an old towel on the plastic bag. Stick the peace sign wherever you want to have it.
I want to have it on the left bottom part of my shorts.
Put a piece of masking tape on the button
because we don’t want to color it and since I am using two spray colors, I decided to
protect the upper part of the shorts, while I am working on the bottom. And we are finally ready to start painting!
Spray your first color allover the bottom part of the shorts like this. You can leave
your color lighter or you can go all out like me and spray a lot of it to get a more opaque
result. Use a paint brush for the edges and corners that the spray didn’t reach.
Flip
the shorts around and spray the back as well. This is how they look so far. Now cover the
bottom part of the shorts with a plastic bag and start spraying with your other color.
I am using this fuchsia pink. Don’t worry if it looks kinda funny right now, because
after a while the colors will start blending and will create a beautiful gradient.
Again
use a paint brush to color the hidden areas around the zipper and under the belt loops.
Remove the bag give it a few final sprays and we’re done painting the front.
Therefore
we can remove the stencil and voila, we are left with a piece sign on our shorts. Spray the top part of the shorts on the back
as well. Here, I am again spraying it lightly with the blue to make the gradient more beautiful,
and that’s it!
Let your freshly painted shorts dry completely and then you can decorate them
with studs. I decided to dress up my back pockets with these cute star studs! First
place them on to see where you want to have them and then you can attach the stars to
the pockets. I am using scissors to twist the metal parts peaking out inside the pocket.
I love how these stars pop on the blue color of the jeans!
I like the studded details a
lot so I decided to add three square studs in the front as well.
And here we go, our
fourth shorts are complete! I am super pleased with how they look. Love how the studs and
distressed edges make the shorts a bit edgy and grungy but bright colors give them that
happy vibe. These shorts are just so full of detail and life and I decided to pair them
with my “It’s awesome” cropped top, white sneakers and some colorful bracelets.
Perfect
outfit for a happy summer day! So this were my four DIY shorts ideas. I honestly
love them all and I am already wearing them like crazy, but tell me in the comments down
bellow, which design was your favorite. Also don’t forget that I have Instagram, Twitter
and Facebook where you can follow me for more personal updates and also some giveaways.
OK, I’m gonna go now because I’m really scared of trolls.
Did you know that they eat stones?
That’s why the houses here are wooden….